
If you’re a business who receives a high percentage of customers via telephone, it can often be a challenge to attribute them a specific piece of marketing activity or channel. Luckily, at least for Google Ads, this challenge has a solution, and even better, it’s free!
There are four types of call tracking within Google Ads…
- Calls from ads themselves
- Calls to a phone number on your website
- Clicks on a number on your mobile website
- Manually Importing calls via spreadsheet upload
(This would require capturing the GCLID (Google Click ID)
This guide will be covering option 2, calls to a phone number on your website. We will also be utilising Google Tag Manager for the tag implementation as this can be used by anyone without the need for developer support.
Before we start, it’s worth mentioning that if you are looking for full multi-channel call tracking, the best solution will be a dedicated call tracking service. Whilst these are subscription-based services, they will offer you the best feature set for tracking and reporting on calls across all channels. If you are more interested in just tracking paid search performance, this guide’s for you.
How does Google Ads call tracking work?
Google Ads call tracking works by dynamically replacing the telephone number on your website with a Google forwarding number. These numbers are automatically generated when someone visits your website after clicking one of your ads. As these numbers are uniquely generated for each ad click, they can be attributed to a specific campaign.
Creating the conversion action
The first step is to create the call conversion action inside of Google Ads. To do this, navigate to Tools & Settings > Conversions and click the blue ‘plus‘ symbol shown below.
Then select ‘Phone calls’ and then select the second option reading ‘Calls to a phone number on your website‘.
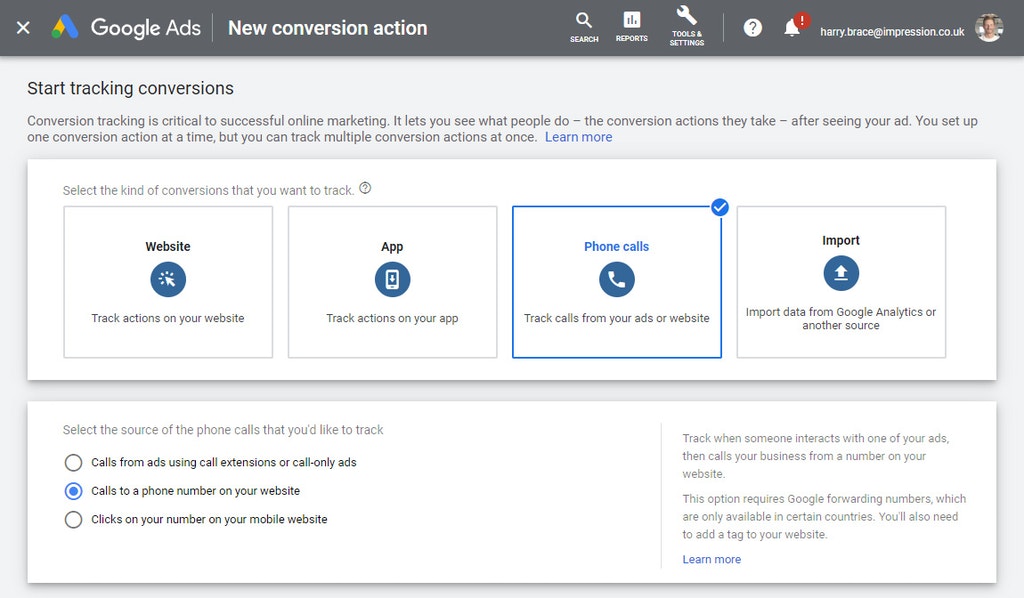
After clicking ‘Continue‘, you can then begin configuring the various conversion action settings that you may be familiar with from setting up other Google Ads conversions. The only notable difference is an option to set the ‘Call Length’. This will set a minimum duration for the call to be counted as a conversion. By default, this is set to 60 seconds but should be changed depending on your particular setup and average call length.
Once you are happy with your settings, click ‘Create and Continue‘. You will be then given various methods to implement the tracking tag onto your website. Select the third tab that reads ‘Use Google Tag Manager‘ and make note of the unique Conversion ID and Conversion label.
Adding the conversion tag to your website via Google Tag Manager
Before you create the new tag, you need to also make note of exactly how your telephone number is displayed on your website, including any area codes and spaces. This enables the tag to automatically locate instances of the telephone number on your website and replace them with the Google forwarding number.
Once you have your telephone number, Conversion ID and Conversion Label to hand, create a new tag and select the built-in tag type ‘Google Ads Calls form Website Conversions‘. You can then configure the tag by populating the three boxes with the corresponding values. Lastly, set the tag to fire on all pages and save!

Testing
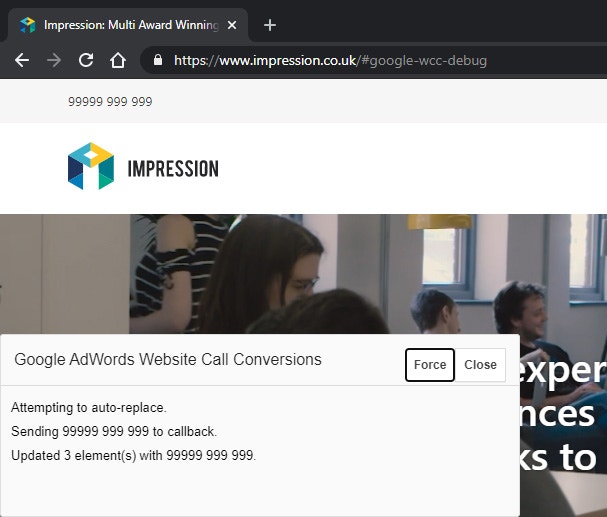
To test the tag, first set Tag Manager into preview mode. This will allow you to run the new call tracking tag locally without having to publish the container changes. Once your container is is preview mode, navigate to a page on your website that contains the telephone number but append ‘#google-wcc-debug‘ to the URL. For example, www.impressiondigital.com/#google-wcc-debug. This will place the call tracking tag into test mode and display a testing window in the bottom left-hand corner of your browser.
Note: If you have Tag Manager in preview mode, you may need to minimise the preview window to reveal it!

Once you see the window, click the ‘Force’ button. The testing tool will then attempt to replace all instances of your telephone number on the page. If successful, you should see your number replaced with test digits. If unsuccessful, revisit your tag in Google Tag Manager and ensure the telephone number is exactly as it appears on your web page.
If your test was successful, you can then go ahead and publish the changes made to your Tag Manager container. Call tracking in now in place!
Final notes!
If you have multiple numbers on your website you will need a call conversion tag for each one, however, you can only track one telephone number per page. For example, if you have contact details for two or more offices on your ‘Contact us’ page, only one telephone number will be trackable.
If you want to track multiple telephone numbers, you need to ensure the following conditions are met.
- Telephone numbers are on different pages
- Each number has its own call conversion tag
- Tags only fire on the pages that contain the corresponding telephone numbers, not all pages as instructed earlier in the guide.


