
Tracking goals through contact forms in WordPress is important for a lot of businesses. It’s been possible now for some time, but with many businesses now moving to Google’s recently out of Beta ‘Universal Analytics‘, many code snippets need updating.
PLEASE NOTE – this method is now deprecated and there is therefore a new preferred way to track WordPress Contact Form 7 via Tag Manager in Google Analytics
After creating a form within the user interface, click into the edit view and scroll to the bottom. Past the standard response messaging, there is an additional settings box. This area can be used to fire JavaScript calls upon different form states. We’re going to focus on the on_sent_ok hook, as that fires once the form has validated successfully and triggered the email send.
Google (Universal) Analytics provides a good event tracking guide here. In essence, the send event that Google is expecting looks like this;
ga('send', 'event', 'category', 'action', 'label', value); // where value is a number.
PLEASE NOTE – for those of you using Yoast’s WordPress SEO plugin, or those with implementations where the ga variable has been renamed, you will need to reflect this new name in your function call. I.e. If you’re using Yoast’s excellent plugin, the line above would actually be this;
__gaTracker('send', 'event', 'category', 'action', 'label', value); // where value is a number.
Of these, the label and value attributes are optional, but sometimes useful if you are tracking goal values – the value you pass into this event will be used in your reporting.
To translate this into WPCF7 events, we’ll need to wrap this in the ready-provided hook we discussed earlier. The end result looks something like this – though note I have removed the optional values for our tracking.
on_sent_ok: "ga('send', 'event', 'category', 'action');"
Be careful to note the usage of single and double quotes, otherwise, you may run into unexpected issues. Once pasted in, you should see something that looks like this, below.
Once this is configured, you’ll need to set up your event within Google Analytics. Log into your account, select the profile your goal should apply to, and select Admin from the top menu. You should see the following. Select goals from the third menu;
When presented with a list of your already set up goals, select New from the action buttons, then select ‘Contact us’ from under the Inquiry goal type. Under the next setting, you’ll be asked to set the type of Analytics event that triggers the goal. We’re using events in this example, but you could easily change out the Analytics code above to fire page views instead (for instance you might open a thank you page in a pop-up or something similar).
Once ‘event’ has been selected from this step, move on to the next step to set up your event conditions. If you are following this example exactly, you should set up your goal like so;
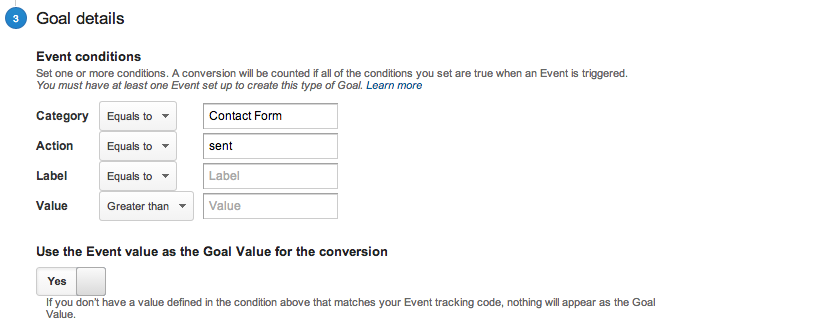
If not, then copy your attributes across from the event firing code you entered into the WordPress Contact Form 7 ‘Additional settings’ box above.
The final step will allow you to verify the goal and finalise the setup. If you are completing this tutorial in one go, then the goal’s historical conversion rate will be 0%, so don’t be alarmed.
If you’ve found this post useful, please let me know in the comments. Or similarly, if you are interested in any of our services; SEO or PPC, then don’t hesitate to get in touch.


