
The plugin landscape has changed a lot has changed over the years — but Contact Form 7 is still one of the most popular WordPress plugin is still one of my favourites.
Tracking events from WP Contact Form 7 in Google Analytics
1. Tag managers and data layers
Well, firstly, the last few years has seen the rise in popular tag management containers such as Google Tag Manager abstract much of your on-site tracking code to the cloud for easier editing. This affects what many may know only as the “data layer”– and if you’re not in the know, I’d suggest reading this long form piece about Google Tag Manager.
2. Plugin evolution
Clearly Takayuki is keen to move from the ability to add custom code into the plugin directly in the favour of custom DOM events (see all) before the end of 2018. DOM — the “document object model” — is best described as the resulting HTML document drawn by the HTML, CSS and JavaScript which runs as a page load. The resulting, dynamic, and potentially changing document, is the “DOM”.
Events can be “fired” in the DOM, and “handlers” can “listen” to these events. These listeners can then process additional scripts based on the outputs. And this is what’s happening here. If you’re unfamiliar with this terminology, then hang in as I’ve got a practical example for you below!
How to track WP Contact Form 7 events in Google Tag Manager
Through tapping into the DOM events WPCF7 registers, we’re able to move the snippets away from the plugin itself – into either your site’s JavaScript files, or arguably even better – into Google Tag Manager. The below snippets can be bundled into your scripts files, but in this tutorial moving forwards, I’ll assume you’ll be using Google Tag Manager only.
1. Getting started
Ensure you have Google Tag Manager installed. This may involve pestering your developers to add the tracking code to your website’s code. Or, it might involve simply adding a plugin (depending on your permissions). As of the time of writing this post, I recommend DuracellTomi’s Google Tag Manager for WordPress as it achieves a few extra cool features (authorship tracking, etc) too all bundled into the plugin code!
Ensure you’ve got a GTM account set up, and get your Container ID added into the plugin.
Also, for debugging, it’s nice to use a Chrome plugin called Tag Assistant by Google (but you can just type “dataLayer” into your browser’s console to view the stacked there, too). Download that for later.
2. Register your event listener in GTM
We’ll need one tag to register our “listener” and then we have a choice;
- Track all contact form 7 form fills as one custom event in Tag Manager
- Track each form as an individual custom event in Tag Manager – this tracks individual form IDs!
Register a new tag and set its trigger to “All Pages”. The type should be HTML and the snippets can be found below;
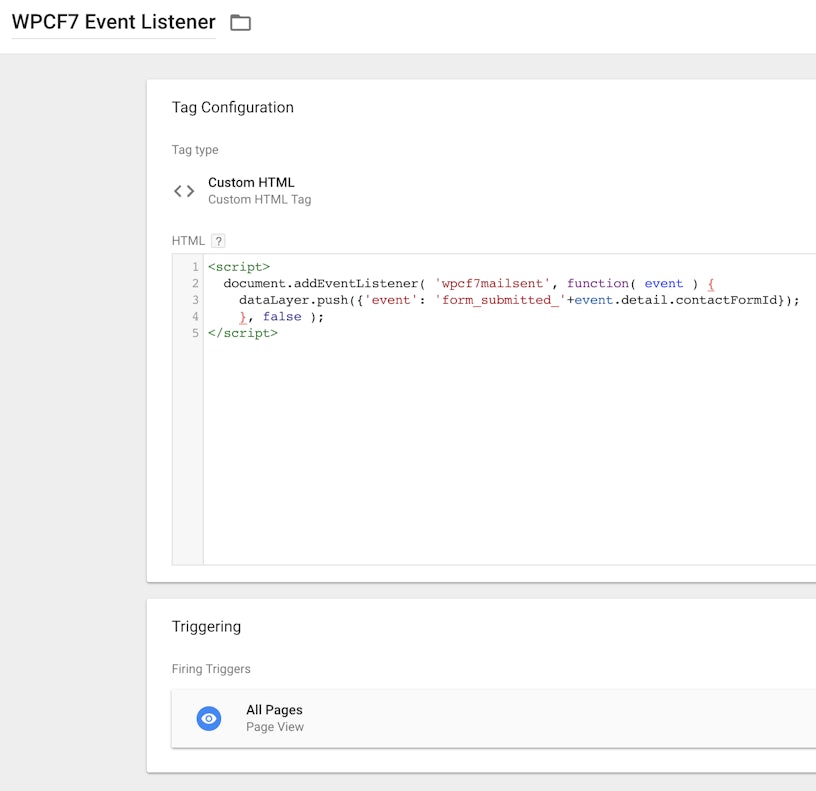
Option 1) For listening to all form completions and triggering only one event;
Option 2) For listening to each form completion and triggering an individual event per form;
This code snippet essentially registers an event listener on “all pages” (it’s simpler that way – room for optimisation if you have time!) for the custom event “wpcf7mailsent” and triggers a dataLayer custom event.
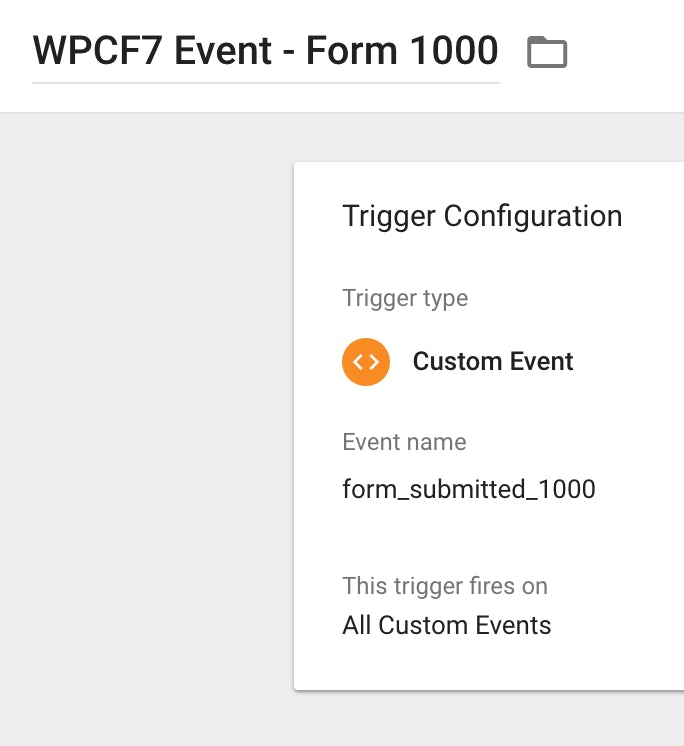
3. Register your custom triggers
If you’ve taken option 1 above, your event will be called ‘form_submitted’. For option 2 – our preferred route – then your custom events will be ‘form_submitted_{Form_ID}’ where Form_ID is replaced inline with your WordPress form ID. If you’re struggling to find this – just check in the image below;

Using this second option gives more granularity in reporting and importantly through Google Tag Manager allows different tags to be fired on different form completions.
To register a new trigger, select “Triggers” from the left hand menu, then “New”. Configure your new “Custom Event” trigger similar to the settings below;
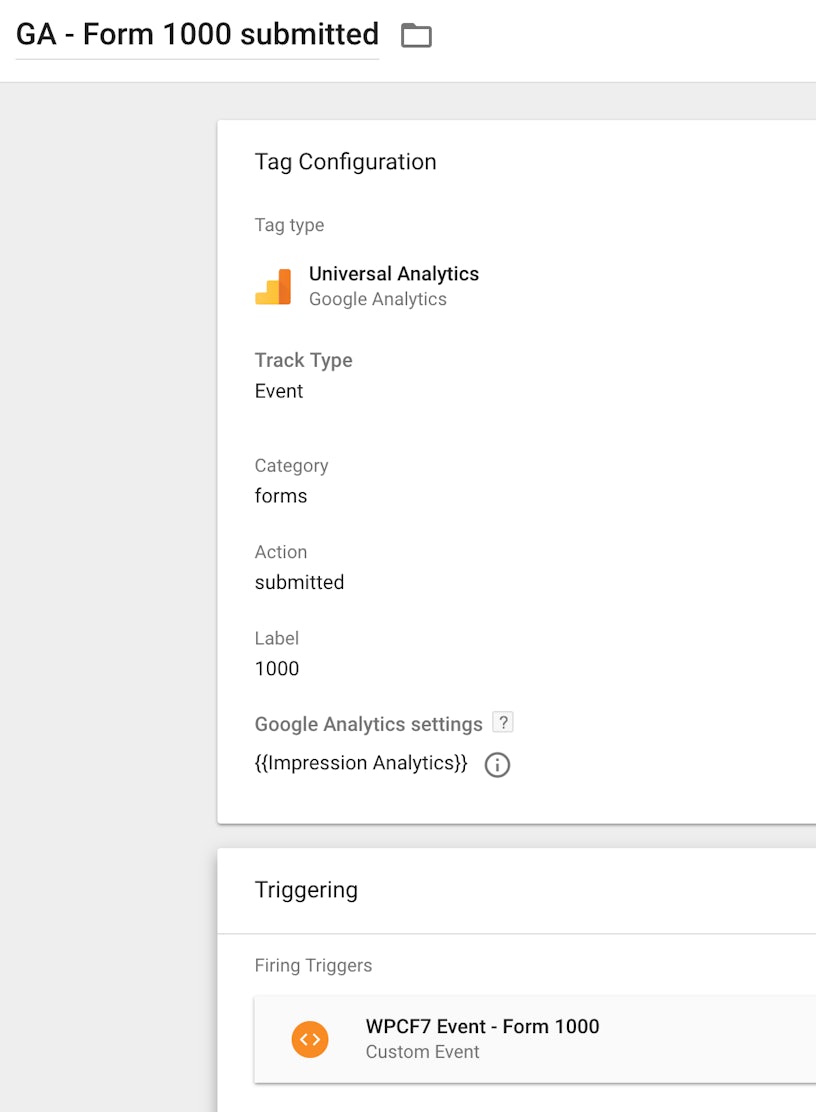
4. Register your Google Analytics (or other) custom event tags
If you’re familiar with creating Google Analytics event tags, then you may want to skip ahead. Here’s how it’s done;
- Click through to “Tags” from the main Tag Manager Workspace menu
- Click “New”
- Name your tag (something like): GA – Form 1000 submitted
- Select type: Universal Analytics
- Track type: Event
- Category, Action, Label (something like): forms, submitted, 1000 (or even something more useful – “Business form” for example)
- Select triggers: The one you made earlier
5. Test your form!
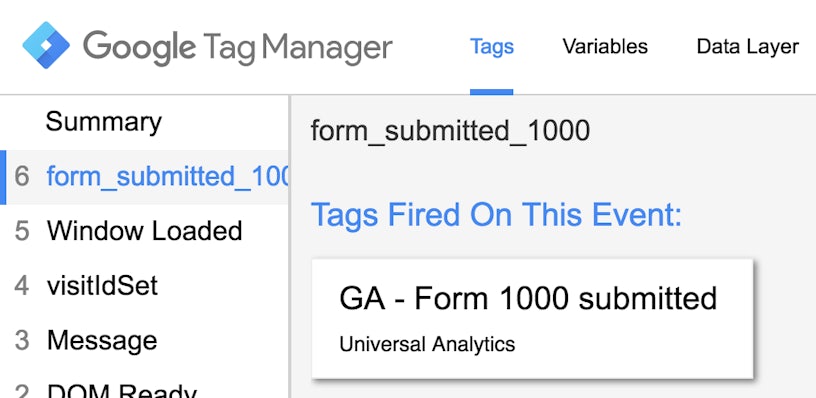
You should be able to see your events in Google Analytics real time. Don’t forget to put your Google Tag Manager container into “Preview” mode like the below, and ensure you “Refresh” if any changes have been made.

In Google Tag Manager Preview Mode, you should see something like the below;
And then this will translate into an event in Google Analytics, like so;

From here, go ahead and set up custom Goals as you usually would. That’s it! You’ve now got a scalable WordPress Contact Form 7 & Google Tag Manager solution implemented!
If you want to learn how to set up tracking goal completions through WordPress Contact Form 7 – read more about it here.
Don’t forget to publish your Tag Container and leave preview modes. If you’ve got any questions, please feel free to get in touch! For more blogs just like these, be sure to check out our analytics & measurement blog.


