
It’s fair to say that with any Shopify site on the web, editing the page.liquid template isn’t the most riveting and customisable area available to try and sell your products. Within most Shopify themes, we would focus on the product or collection pages, because that’s where the conversions happen, right?
What if, with a little bit of liquid templating magic, we could do a whole bunch of powerful things with our Shopify pages?
A little while ago, I came across Shopify meta fields, a very useful tool to help enhance any liquid template by pulling in custom menus, collections and products. This post is designed to take your Shopify pages to the next level, by guiding you through:
- Creating a meta field.
- Pulling the metadata into your page.
- Using this data to create a custom menu on your Shopify page.
- Pulling JSON data from each list item in the custom menu.
- Extending this functionality, to create a dynamic and unique Shopify page.
Creating a meta field
Before we get started, adding a metafield to your page requires additional help.
In essence, the metafield feature allows us to store information, related to products, collections, orders, blogs and pages. Using the Shopify metafield API we can access this data, which we can then use in our code. For example, we could use metafields to show related products, display an image gallery or provide downloadable content.
To see an example of this, trying adding metafield.json to the end of a collection url on your site, and you should be presented with a wealth of information, available for you to use e.g.
website/collections/jackets/metafields.json
At the moment, this data may look a bit odd, but it contains a lot of detail we can use on our pages!
A quick and easy way to start adding data to these metafields without being too technical is using browser plugins. I highly recommend installing the ShopifyFD plugin, it’s free, and in my opinion the easiest way to quickly add metafields to your pages.
Creating your first meta field
Now we’re ready to go, lets go ahead and create a new page template. For this guide, I am going to assume your looking to pull in collections into a page.liquid file, so lets go ahead and name this ‘page.collection.liquid.’ Inside a new page, select to use this new template, and when you’re ready, click on the little green plus in your chrome plugins tab, and with any luck you should see a new content block appear, that will look similar to this image:
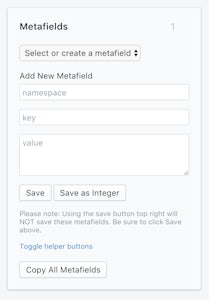
Now we can start creating our first meta field! For a more detailed description on how each field works, I recommend taking a look at this post by Shopify, but for now, as we are using this metafield to control a menu, let’s go ahead and enter these details and save (make sure you save in the metafields block, saving the page will not save the metafield.)
Namespace: menu_meta
Key: menu_key
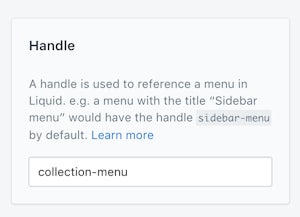
Value: collection-menu
The value of this meta field ‘collection-menu’ will be the essential link that pulls in our custom menu into the page, so without further ado, let’s navigate to our online store in the Shopify admin, click on navigation, and create a new menu.
To complete the link, it is important that the metafield value and handle of this menu are the same. Once your meta field value and menu handle match, we can start pulling content into your Shopify page.
Pulling the metadata into your page
Before we get stuck in, take a minute to add all the collections to your menu that you want to appear on this page. When your happy, navigate to the page template and add this code to pull your metafield into the page:
{% assign menu_menu = page.metafields.menu_meta %}
{% assign key = 'menu_key' %}
{% assign key_val_menu = menu_menu.menu_key %}
Firstly, we want to make sure the liquid template pulls in the correct meta field, so we define the name of the menu we assigned on the page e.g.
{% assign menu_menu = page.metafields.your_custom_menu_name %}
Secondly, in order for us to pull in the menu key, we must first create and assign our key variable:
{% assign key = 'your key name' %}
Thirdly, now that we have pulled our menu from the meta and created a key variable, let’s go ahead and pull the menu key from the menu and assign this to a variable.
{% assign key_val_menu = menu_menu.menu_key %}
Perfect. So, just to make sure we have the key, output and check the variable into your page like so, and when you’re happy continue to the next step…
{{ key_val_menu }}
Creating a custom menu with metafield data
Now that we have all the details for the menu outputting to the page, let’s try pulling in the menu to the liquid template. The code snippet below shows you how to output a very basic menu, which we’ll use as a starting point for our dynamic menu.
<ul id="my-dynamic-menu">
 {% for link in linklists.your-menu-handle.links %}
   <li><a href="{{ link.url }}">{{ link.title }}</a></li>
 {% endfor %}
</ul>
Now, you’ve probably guessed the ‘your-menu-handle’ is what needs changing in the ‘for’ loop. In order to pass our variable into the loop in liquid, we have to use square brackets, to declare it as an object. If we were to use this menu on one page, using the string of the menu would be enough, e.g.
{% for link in linklists.collections-menu.links %}
However, by pulling in the liquid variable, we can define which menu we want to pull in via the meta value inside the Shopify admin area, allowing us to create multiple pages with unique menus on the same dynamic template!
<ul id="my-dynamic-menu">
 {% for link in linklists.[key_val_menu].links %}
   <li><a href="{{ link.url }}">{{ link.title }}</a></li>
 {% endfor %}
</ul>
So there you have it, the very start of your own dynamic menu! Depending on your Shopify site, you could customise this menu further using more liquid variables inside the for loop e.g. create a count and pass this into your links to create unique IDs:
<ul id="my-dynamic-menu">
 {% assign count = 0 %}
 {% for link in linklists.[key_val_menu].links %}
  {% assign count = count | plus: 1 %}
  <li><a id="link{{ count }}" href="{{ link.url }}">{{ link.title }}</a></li>
 {% endfor %}
</ul>
So we have a menu, pulling in from our metafield, but what if we could take this one step further, and start pulling information from each individual link in the menu onto our page?
Using a method similar to our metafields.json example from earlier, we can now start pulling information in from our links in the menu using javascript, so if you’re up for the challenge, keep scrolling!
Pulling data from each link in the dynamic menu
To get started with this step, it’s important we make sure we are first pulling in jquery into our theme. Most themes include a link to the latest jquery in the theme.liquid file, and will look similar to this example below:
{{ '//ajax.googleapis.com/ajax/libs/jquery/1.9.1/jquery.min.js' | script_tag }}
If not, place a link to to your jquery before your other scripts, to ensure we have everything we need to start writing in jquery.
Now, in our theme’s javascript file, let’s make sure we can pull the url from each list item in our dynamic menu by using the code below, and wrapping it in a document ready function:
$( "#my-dynamic-menu li a" ).each(function() {
 var itemURL = $(this).data('url') + '.json';
 console.log(itemURL);
});
So here, we’re asking for the url of each list items anchor tag which we set up in our liquid template, adding ‘json’ to the end of it, and logging it to our console. This way, we can see the URLs we will be using to pull information for each list item into our page, which, depending on your Shopify setup, should look something like:
/collections/jackets.json
Now we have our URLs working, let’s start pulling in the information from each of them. In order to do so, let’s use the getJSON method in our for loop.
$( "#my-dynamic-menu li a" ).each(function() {

 var productUrl = $(this).data('url') + '.json';
 var staticUrl = $(this).data('url');

 $.getJSON( productUrl, function( json ) {
 });

});
So here, we are passing our productUrl into the getJSON function, which will return all the data associated with that page.
If you’re interested to see what we’re working with, add one of the URLs being pulled in to the end of your site URL, and you should see what seems like a long list of words and brackets.
To view this info a bit more clearly, I recommend installing a json browser plugin like JSON Viewer, once installed, it will be much easier to see what information we have available to us.
Depending on what you have added to your collection pages in the Shopify admin, you should be able to see the id, title, handle, description and image data. The best thing is, all this information is available for us to pull in to our page! So let’s give it a go…
Using the data from each menu item
Now for the interesting part: outputting the content from each menu item into our page. This next step requires us to parse the json feed per menu item, to get all the information we want on our page.
To pull in our snippets, the title, description and image, let’s create variables which will pull in the content for each. In each variable, we want to access the collection object, so let’s start by parsing the first level of the json feed by using ‘json.collection’. Now that we are inside the collection object, add on which item we want, ‘json.collection.title’, ‘json.collection.description’ and ‘json.collection.image.src’.
$( "#my-dynamic-menu li a" ).each(function() {

        var productUrl = $(this).data('url') + '.json';
        var staticUrl = $(this).data('url');

        $.getJSON( productUrl, function( json ) {

            var collectionTitle = json.collection.title;
            var collectionDescription = json.collection.description;
            var collectionImage = json.collection.image.src;

         });

 });
The level of detail required in each variable depends on how deep the information is within the object. For example, we can identify that the image source is the deepest in our object, available at collection > image > src, were as the other two variables are a level up in the hierarchy. I recommend at this stage console logging the information, just to make sure the information is outputting correctly.
Now let’s start outputting this data into some html we can work with by creating some new variables that use our data to create a content block on our page.
var collectionTitle = json.collection.title;
var collectionDescription = json.collection.description;
var collectionImage = json.collection.image.src;

var productStart = '<div class="product">';
var productImage = ' <div class="product__image"><img src="' + collectionImage + '" alt="' + collectionTitle + '"></div>';
var productTitle = '<h3><a href="' + staticUrl + '">' + collectionTitle + '</a></h3>’';
var productDescription = '<p>' + collectionDescription + '</p>’';
var productEnd = '</div>';

var product = productStart + productImage + productTitle + productDescription + productEnd;
Here, with each variable, we are combining our json data with HTML, to create different elements that will appear inside a product block. The final variable ‘product’ is a combination of each variable to create a complete element comprising of an image, title and description, which we will now output to the page, with the append function.
Firstly, create a div on your page with the id ‘product_container’ where you would like to show the product blocks. Secondly, let’s output the completed variable to our container, with the code below.
$( '#product_container' ).append( product );
Thirdly, refresh your page and check your content, you should now be able to see content for each list item, outputting to your page! Now all that’s needed (I am guessing) is a little bit of CSS, and our dynamic page is complete.
So there you have it: a completely dynamic Shopify page, all running off that one metafield. Pretty cool, eh?
$( "#my-dynamic-menu li a" ).each(function() {

        var productUrl = $(this).data('url') + '.json';
        var staticUrl = $(this).data('url');

        $.getJSON( productUrl, function( json ) {

            var collectionTitle = json.collection.title;
            var collectionDescription = json.collection.description;
            var collectionImage = json.collection.image.src;

            var productStart = '<div class="product">';
            var productImage = ' <div class="product__image"><img src="' + collectionImage + '" alt="' + collectionTitle + '"></div>';
            var productTitle = '<div class="product__details"><h3><a href="' + staticUrl + '">' + collectionTitle + '</a></h3>’';
            var productDescription = '<p>' + collectionDescription + '</p></div>’';
            var productEnd = '</div>';

            var product = productStart + productImage + productTitle + productDescription + productEnd;

            $( '#product_container' ).append( product );

         });

});
Extending your dynamic page
Every Shopify site is different, so it’s important to consider things that could help your dynamic page. Below are suggestions to help extend your page to combat issues you may face e.g. page speed.
- Introduce a loading gif initially, to indicate the product blocks are still loading into the page, then fade in your container.
- Introduce the count liquid variable to create unique IDs per list item.
- Use the product count from each collection inside the json object and display it in the product element.
- Introduce ‘if’ statements to only show content when it is available.
- Use a similar for loop to pull products from a collection, using the URL of the collection page.


